Showing posts with label sewing. Show all posts

Tuesday, March 29, 2011

Monogram Button Pillow

I sewed up this easy pillow project yesterday and I'm so pleased with how it turned out. No tutorial because this project is all over the internet, but it really is very simple. If you've never sewn a pillow cover before, Cottage Magpie has a simple step-by-step tutorial that I've used several times with great results. This was my first time adding in the piping around the edge of my pillow and I'm mostly satisfied with the results. I do have room for improvement for next time though! (And apparently I should have ironed the front of my pillow. Whoops!)

I bought the buttons for my initial at Saint Vincent de Paul (they have a huge bin of monochromatic buttons) and drew a letter on the front of my pillow with a sewing pencil. Then I just sewed buttons on as I went. No fancy layout or anything like that. Except for cutting out the fabric, I did all of this yesterday--it really was a quick and easy project, nothing fancy at all!

I'm still deciding where to put it--I kind of like it here with my new ruffly pillows... At any rate, I'm really happy with the results!

Linking to: Hookin' Up with HoH at House of Hepworths

Thursday, April 1, 2010

Easter Egg Felt Garland Tutorial

Looking for a last minute Easter project? Try my Puffy Easter Egg Garland! Remember the Puffy Heart Garland from Valentine's Day? Well, this is the Easter version! I made this using only supplies I had on hand--I love free projects!
Step one! Make an egg shape pattern and pin it on your felt (I made all pink eggs--do whatever colors you like!) and cut out your egg shapes. I cut two eggs shapes at a time because I wanted to stuff them and sew them together.
Decide how to decorate your eggs! I cut out strips of white felt with my pinking shears. When I did the Valentine garland, I decorated with buttons. Do whatever you want!
Stitch your decorations onto your eggs. I sewed mine by hand because I didn't feel like hauling out my sewing machine. Plus this way I could do it while I watched television. The pin is there to keep the back piece of the egg matched up with the front piece.
Stitch partway around the egg (by hand or machine, doesn't matter!) and stuff the egg with Polyfill or felt scraps or whatever you have on hand. Then sew the egg all the way closed.
I used embroidery floss to stitch everything on these eggs because I have a lot of it and I think it is sturdier than thread.
The final step is to stitch the backs of your eggs onto some grosgrain ribbon. I put the ribbon up on my fireplace and then pinned the eggs in place. Then I took down the pinned garland and handsewed the ribbon onto the eggs before rehanging my garland.
(That's my six year old as a newborn in the hospital--except both my babies looked identical as newborns, so I keep it up there as a reminder of both of them. This was my inspiration picture while nursing my firstborn--we had an extremely rough start to nursing, so I would look at this newborn picture with her face all shiny with mama milk and remember why I was doing what I was doing. We went on to nurse for two years. My second child nursed until he was almost four. I am so happy I toughed out an absolutely miserable start to nursing because it ended up being one of the most rewarding experiences of my life.)

So, there you have it! A last minute free Easter decoration that you can make while watching television. Crafting doesn't get much easier than that!

Wednesday, March 31, 2010

Wedding Crinoline into Dress Up Skirt Tutorial

Princess is outgrowing most of her dressup clothes but definitely hasn't outgrown the desire to play dress-up yet. She has always been tall for her age and now, at age 6, is 51.5 inches tall--yes, she's a tall one! She is in kindergarten but looks as though she should be in third grade. The dress up clothes that fit her as a three year old no longer work.
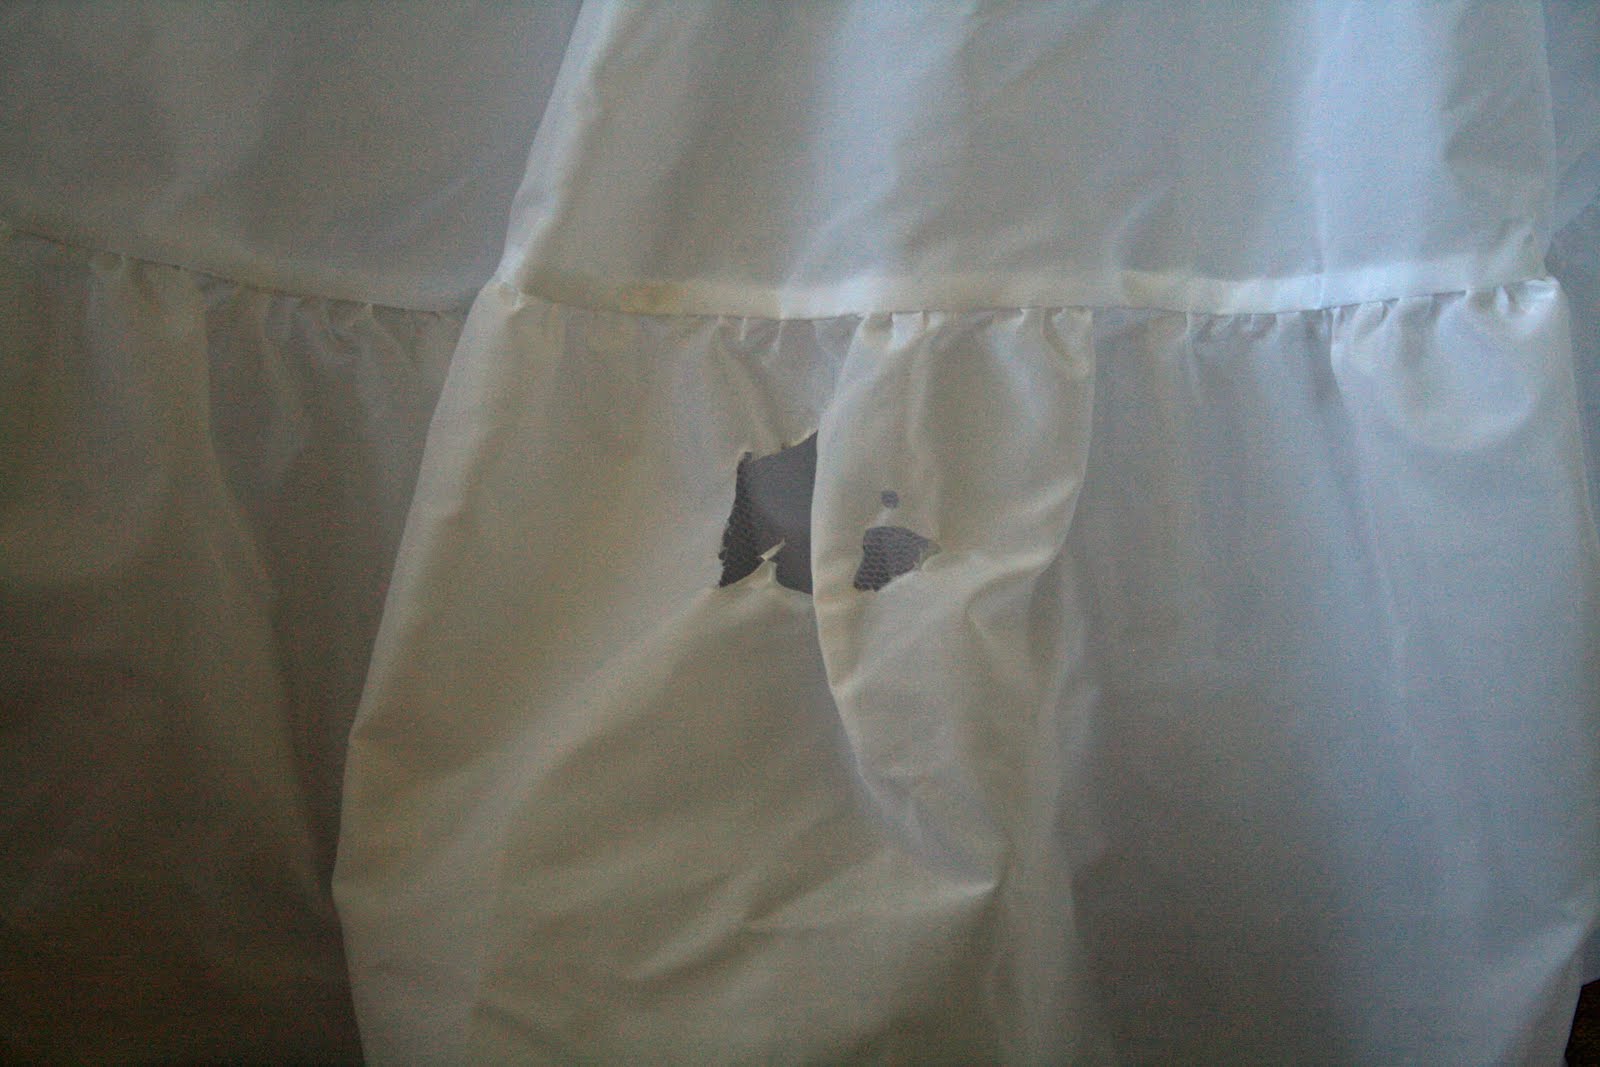
While browsing at a thrift shop, I came across a bridal slip on the rack and thought, with a bit of tweaking, it would be perfect for my little girl. It had a small hole in the bottom tier of the skirt which made me happy because I was able to get the price knocked down even lower--I think I paid about $2 for this slip!
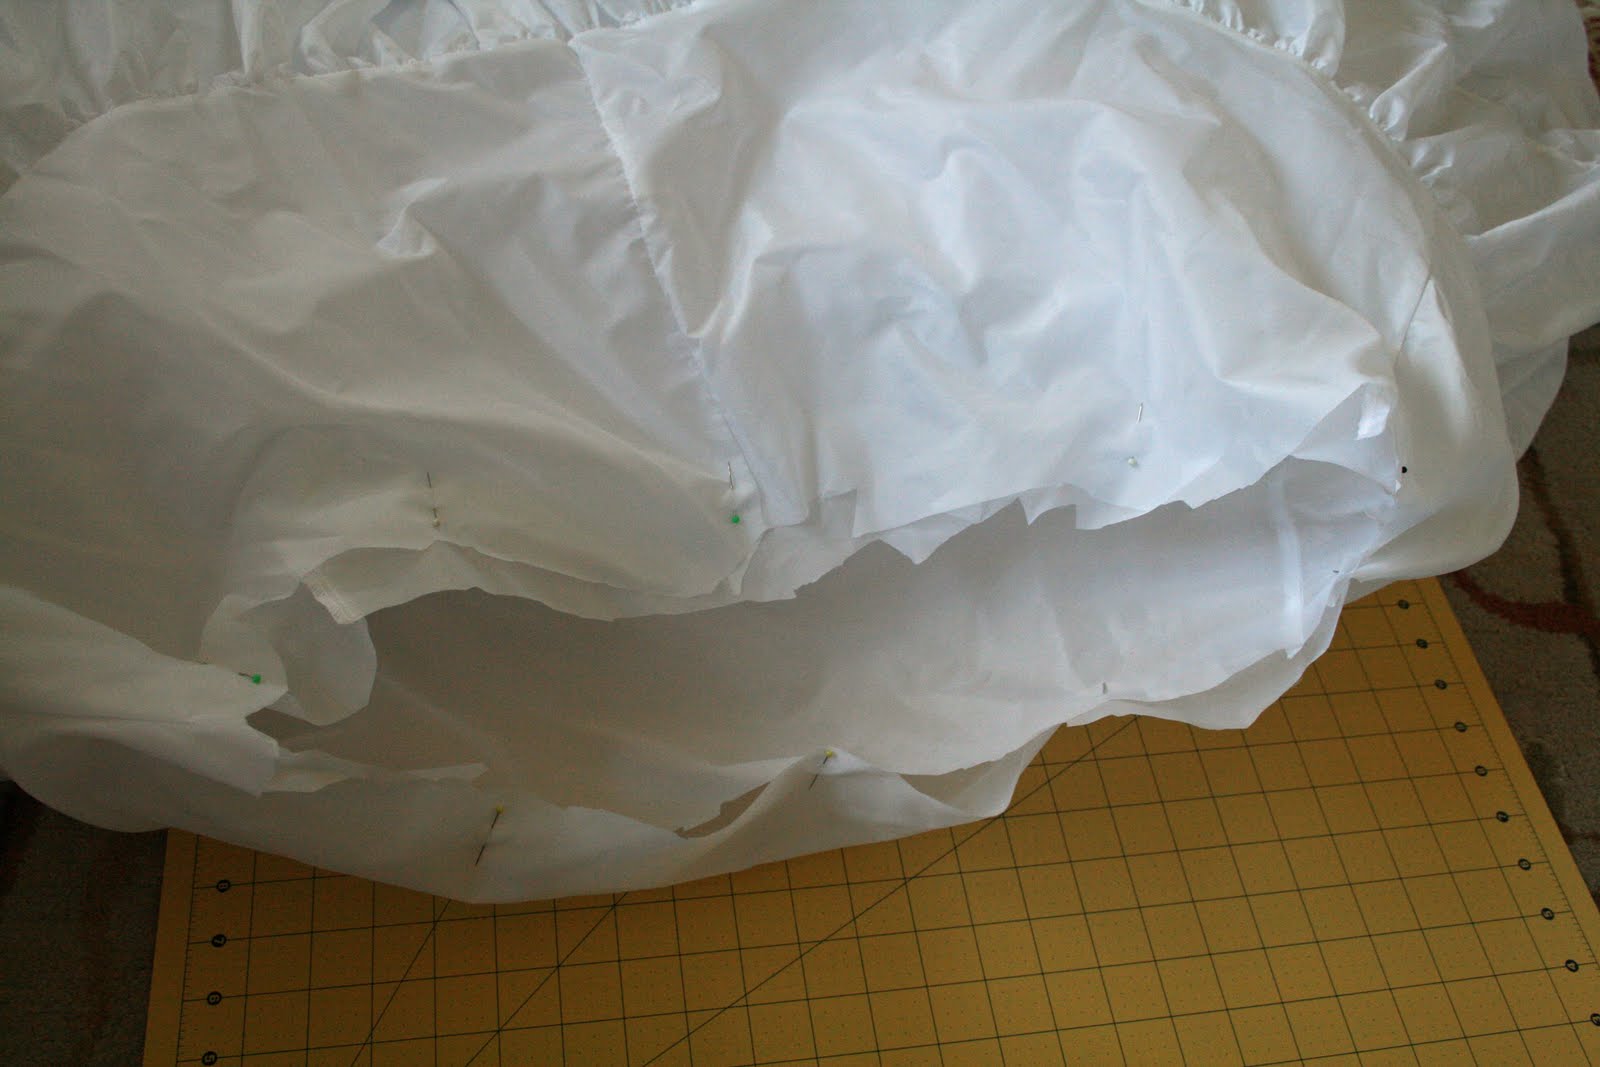
I brought it home and, after washing it in the machine and letting it air dry, I cut off the top of the slip--this slip had an elastic band at the top and a long zipper. I cut it off just below the zipper. I didn't do a very good job cutting it at all!
Nice jagged edge! I told you I didn't do a good job cutting it! My next step was to pin the inside and outside layers together. This stuff was slippery! Then I used my sewing machine to sew a straight line around the edge to keep those layers together. Next it was time to deal with that hole in the bottom tier.
First I cut it out. (Please note that I redeemed my cutting skills on this part...nice straight cuts!)
Then I stitched the opening closed and sewed over the little tab of extra fabric at the top.
No more hole for my children to "accidentally" rip and make bigger...and bigger...and bigger... This extra line of stitching will get lost in all the pouf of the slip.
My final step was to fold over the fabric at the top of the slip and make a spot for the elastic to go in. As I mentioned before, this fabric was slippery and I have no experience sewing or pinning this kind of stuff. I just folded it and sewed a straight line. I left an opening for the elastic and threaded it through (I already knew my daughter's waist measurement from some skirts I made for her) and then sewed my loop of elastic shut and then sewed the opening shut. That was it!
And that was it! One bridal slip turned into an extra twirly dress-up skirt for a very excited little girl!
Yes, she loves it!
(I'm not sure why it looks bunchy in this picture--it looks great in real life!)

Here is when I realized that I have my own bridal slip just.like.this.one. upstairs in the closet taking up space. ARGH. Can you dye these? Maybe I can dye mine pink and make another twirly skirt for dressup? Hmm...

Wednesday, March 24, 2010

Projects in Progress

Whoah, Nellie! I am in the midst of, dare I say, TOO MANY PROJECTS! What kind of crafter are you? Do you do one project before the next, or do you have ten bajillion of them going at the same time. It is feeling a bit chaotic around here--but I'm proud of myself, I went to JoAnn's AND Michael's today to return things and all I bought was one dowel at JoAnn's. I didn't allow myself to browse at all because I don't need any temptation to start new projects right now!

Here are pictures of some of my works in progress. (I say "some" because from where I'm sitting in the family room I can see two more...and I know that isn't all!)
This project is SO close to being done...I just need to find the right photographs and hang it up. Except I might repaint it (again) first. Hmmm.
This project actually is done and hanging on the wall, but I have so many unfinished things piled in front of it that I can't take a picture. Or at least not a picture that will actually show you THIS project and not all my other unfinished stuff.
This one is done too--but in the same vicinity as the one above and thus also partially obscured by STUFF.
This one is so close to being done. So close. But my little guy has been having fun playing with the pieces, so I've procrastinated finishing it up.
This is the BEFORE picture of this unfinished project. I've been at a standstill on this one for six weeks (after first stripping off all those hideous flowers and leaves) because I'm not fortunate enough to have a Hobby Lobby anywhere nearby and thus can't find faux boxwood. Woe is me.
This one I'm actually done with...but have yet to edit the pictures (as evidenced by the really dim picture posted here!)
Haven't started this project. I do, however, have a sanding block, folded dropcloth, and can of spray paint sitting on my kitchen floor waiting for me to start...does that count?
This is a BIG project involving our whole family. Let's just say Handsome is VERY excited about this one!
And then of course there are these projects--my most important projects of all. Having the opportunity to help shape and form them is amazing and one that I am so blessed to have. I love these children so incredibly much.

Tuesday, March 23, 2010

Sewing with Children

I've been doing a lot of hand sewing lately and Princess has been eyeing my needle and thread rather longingly. I finally got myself together and got her some sewing supplies. I bought all of these supplies at JoAnn's. I don't have yarn, thus my purchase of these little spools--they were right next to the plastic canvases and were $1 each, except for the ones that were clearanced.

HOWEVER, don't be fooled (like me!) and buy the children's needles that also are stocked right next to the canvases because they don't actually fit through the holes on the plastic! So frustrating! Luckily I had a fairly blunt regular needle (a tapestry needle--not that I've ever sewed a tapestry) in my supplies that she was able to use.
Be sure to check the thrift stores, too! My St. Vincent de Paul had this bag of square canvases for less than a dollar! They had a bunch of other ones, too.
She was thrilled and got the hang of it right away. I threaded the needle (because the yarn really was too big for the eye of the needles I have) and tied a knot on the end of the yarn, and that was it!
She was so excited to be "sewing like Mama!!"
I had to kick her out of the house and make her go play outside--she wanted to stay inside and sew her little heart out!
The proud little seamstress with her first sewing project. I'm keeping it forever! She now is hard at work on a creation of her own design--alternating pink and purple rows on a square canvas.

Linked to Mom Tried It

Thursday, February 18, 2010

Dropcloth Table Skirt

Our office area is a work in progress--but I've actually made progress on it, so that is an improvement! The picture above is from the very end of the construction phase of our house addition. We now have our family room furniture clustered around the rug in front of the fireplace--which left all that room behind the couch (around the other rug) for an office area. Up until now our office area has been (mostly) hidden inside an armoire in our formal living room. There also was a corner of our master bedroom that was overrun with scrapbooking items. However, I'm still not completely sold on the idea of having everything out in the open, so we didn't want to spend very much money on our office area...just in case I change my mind!
Instead of buying nice wood desks, we bought two folding tables at Costco for about $30 each. Functional, not too horrible looking...but they did nothing to hide all our stuff. I don't like seeing clutter and this is a lot of clutter! Well-organized...but still clutter! See those white bookshelves on the right--we built those using plans from Knock Off Wood. They're knock-offs of the Pottery Barn Cameron Two Shelf Bookcase.
Lots and lots of stuff--none of which I want to look at on a daily basis!! So, I decided to skirt the tables. I bought a beautiful brown damask on sale at JoAnn Fabrics--got it home and realized it looked horrendous with my area rug!! Not good! So I looked around at what I had at home and realized I had an extra dropcloth leftover from my dropcloth curtain project. A bit beige, but the price was right! (I think I originally paid about $9 for it at Lowes.)
It worked beautifully! I sewed (just straight lines--nothing fancy!) two panels for each table because my husband wanted a place where he could easily reach in to get things or put his legs when he's sitting at the computer. (I didn't really understand the need for a leg spot since he usually sits like a five year old with his legs curled up under him, but whatever, I humored him.) Then I hotglued the panels to the edge of the tables. I used a LOT of hot glue--so far it is holding on really well!
The area definitely still is a work in progress and needs some wall decor and prettying up, but I'm thrilled to no longer be seeing all that clutter under our desks/folding tables/cheap solution! I know it is a bit beige right now, but I think wall decor will help break up the beige factor--plus my Pottery Barn area rug has lots of big flowers--you just can't see much of it in these pictures.

More pictures to come after I make more progress! I'm linking this to Jen's Weekend Wrap-Up Party and Kimba's DIY Day.

Thursday, January 28, 2010

Valentine Garland Tutorial

(apologies for my photo quality...I'm tired and took these on auto with a flash)

I've spent some time the last few days working on a puffy Valentine heart garland for my mantle. I mostly made this during naptime--it really isn't a multiday project, but I've had a crazy week! My little boy loves this garland and sang me a song today about "puffy hearts"--it was very sweet and brought a smile to my face.

Supplies:
heart cookie cutter (or the ability to freehand a good heart shape!)
red felt (1/8 - 1/4 a yard, depending on the size of your garland)
white felt (1/8 a yard)
red buttons
red embroidery floss
white embroidery floss
polyfil (or just use your scraps of felt to stuff the puffy hearts
white grosgrain ribbon
First I used my Wilton heart cookie cutter and an ink pen and traced a bunch of hearts onto red felt. I used cheap felt sold by the bolt at JoAnn's. You could use felt squares too--but the other felt was on sale, so that's what I bought. I just used a regular old pen, not a fabric pen to trace the hearts--it worked just fine.
Then I traced a big heart onto some scrap paper and eyeballed it and traced a smaller heart inside it and cut that out to get the template for my smaller (white) hearts. Then I traced and cut my white hearts out of felt.
This bag of buttons was on sale at JoAnn's--usual price is $2.29. I don't have a button stash and I'm envious of those of you who do.
I used embroidery floss (it is very inexpensive--under 40 cents each) to sew on my buttons. I chose white floss to sew on the red buttons because I like the contrast. On some hearts I sewed three buttons and on other hearts I did one button.
I did all of the button sewing before moving onto the next step.
Next I used red embroidery floss and stitched (just a basic straight stitch--nothing fancy, although you could do a blanket stitch) 3/4 of the way around the white heart, sewing it down onto the red heart. Then I grabbed some polyfil (fluff!) from my stash. You also could use the scraps of felt from when you were cutting out the heart shapes.
Stuff the fluff into the little pocket you've made. I put in a tiny bit more fluff after I took this picture. Then you stitch up the opening the rest of the way.
After all your hearts are made (and your little boy ooohs and aaahs over them!), start pinning them to some grosgrain ribbon. I took my ribbon and my pile of hearts over to my mantle and put my ribbon (still attached to the spool at one end!) where I wanted my garland to go and then I pinned the hearts on while standing in front of the fireplace. I'm glad I did this because I had been planning on sewing the ribbon on the back of the middle of the hearts. Apparently I forgot about gravity...because as soon as I pinned the middle of a heart back onto a ribbon, the whole thing tipped forward and looked ridiculous! Ooops! Everything worked much better after I pinned the heart tops to the ribbon. I didn't do any measuring--just pinned the hearts where I thought they looked good. Then I took the garland back to the table and used red floss and did some straight stitches and sewed my red hearts to the white ribbon. I think you could even use hot glue for this step, but I didn't feel like getting out my glue gun.
That's it! So easy and it turns out so cute! (click on picture to enlarge it) My husband was quite surprised at how such a simple project can have a big impact. (And yes, I know there is a big blank space staring at you--I took down the twig wreath I had up there because I really didn't like it at all. I have a project planned for above the mantle...now I just need to find some time to do it!)

This project was super easy and I just love how it turned out. Please let me know if you try it--I'd love to feature your project!

Making this puffy heart garland reminded me a lot of the Valentine wands I made last year--my children still love those wands!