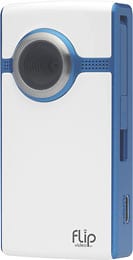
Look what I just won from Today's Creative Blog and Just Ask! It is a Flip video camera! I'm so excited! I think this is the biggest blog giveaway I've ever won!

 Last week I was looking for a fun craft for both my children and decided to have them make stained glass crosses. We had all the supplies on hand--tissue paper (that I cut into squares), clear contact paper, and black paper (that I cut into two cross outlines per child).
 I taped down a section of contact paper (sticky side up!) for each child and put down a cross outline. Each child also received an individual bowl of tissue paper squares. Taping down the contact paper helped keep their projects from moving.
 My preschooler went for the random approach for his stained glass cross.
 My second grader aimed to cover every exposed area of her cross.
 When your child is done with their masterpiece, put the second cross outline on top of the first (to hide the spots where the tissue paper overlapped the first outline). Then put a second sheet of contact paper down--with the sticky side on top of the artwork to seal everything inside. The final step is to trim around the project.
 Beautiful!

 My little girl turned seven in December and, to celebrate, we had a ballerina birthday party at our house. She has been in ballet lessons since she was three (literally--she won't even take the summers off, that is how much she LOVES ballet and dancing!) and currently her career aspirations are wavering between fairy princess and ballerina. Oh, to have such sweet dreams!
 I made her invitations using supplies I purchased at Michaels craft store. I was heavily influenced by the sweet tutu invitation I came across on A Little Loveliness, but I adapted it to fit my own needs. I printed my invitation details onto pink cardstock. Then I sketched a basic leotard shape and made a pattern that I then traced onto my pink cardstock and cut-out all of the invitations. I used a small hole punch (that happened to be a small heart hole punch) and threaded a length of pink tulle back-and-forth through the bottom of the invitation to be the skirt of the tutu. At the neckline of the leotard I used a string of stick on faux pearls from the scrapbooking section of the craft store.
 I absolutely LOVE the ribbon canopy over the party table. The credit for this design goes to Glory of Glorious Treats. I came across a picture of a party she did for her daughter and knew I had to do the ribbon canopy for my daughter. It was AMAZING and my daughter and I both loved the effect!
 Look how pretty all those ribbons are! My husband built the framework for me out of some inexpensive wood and he and my preschool son painted it white. He screwed little eyehooks into it so that we could hang it from the ceiling per Glory's instructions. Then, one night after the children went to bed, we hung it from the ceiling using 3M Command Hooks--the ones with the little silver hooks. I tied all the ribbons on after it was already up on the ceiling. It took a LOT of ribbons!
 I put the girls' tutus on their chairs. I bought these from Halo Heaven for less than $2.00 each! (I had a coupon code, so it was even less than the price on the website.)
 The runner on the table is wrapping paper from Target. On the center of the table I put out some sweet treats for the girls. In the milk glass container I piled up pink strawberry Whoppers and I used the curvy edges of the container to hold the candy dipped marshmallow pops. (They're just like the ones in this post from 2009.) There also are small containers of strawberry dipped Pocky sticks. The cupcakes are on inverted wine glasses from the Dollar Store. I bought those glasses last year for my daughter's Fancy Nancy birthday party. The ballerinas on the plates were cut with my Cricut.
 In the family room I had craft stations set up--ballerina coloring pages on the coffee table and a second table with supplies for making ballerina clothes pin dolls. We also dressed up the American Girl dolls in ballet outfits for the occasion! And, as you can see, I made a lot of tissue paper pom poms to hang from the ceiling. I love the visual impact this gave the space! Much more impressive than the streamers I've done in the past. Plus the heavy dose of pink helped to take away from the Christmas decorations that I also had going on (this was December, after all!)
 When the girls first arrived at the party, they socialized and colored ballet pages that I printed off the internet. Then they made these clothespin ballerinas. I had the supplies all organized for them in tin soup cans that I tied tulle around. The ballerina pictured here is a sample one that I made. It was really helpful to make a sample as it forced me to streamline the process and simplify things a bit.
 Next we had a ballet lesson from one of the senior company ballet girls from our dance studio. So exciting! She really worked those girls--it was fun to watch them! At the end of the mini lesson she got out her pointe shoes and those little girls were in awe!
 Next we did "pin the bow on the ballerina". Not exactly a traditional ballerina game, but it works for us as my little girl ALWAYS wears hairbows! I found this cute clipart image of a ballerina online and it was simple enough that I was able to freehand it onto some posterboard. I gave each girl a bow with her name on it and stuck a piece of tape on the back of it. After that we played "pass the parcel" before letting the girls make their own ice cream sundaes.
 Then it was cupcake time! (And in the background of this picture you can almost see a party decoration that I forgot to get a good picture of...big ballerina cut-outs done on the Cricut that I hung in the windows on clear thread...they moved/danced every time the heat came on and whenever anyone walked by. It was very neat!)
 Happy Birthday, Pumpkin Pie! I love you now and forever!
 Yesterday I talked about the gifts my daughter gave her teachers. Today I want to talk about door decorating. I've seen the idea of decorating classroom doors for teacher appreciation day online, but never in person--still, I was excited to bring this idea to my daughter's school this year. She attends a preschool-grade 8 school, so it was a bit of a challenge to make it work for all the grade levels, but I think we did it. The teachers LOVED it and were totally surprised by the doors.
 This is the preschool door--with the teachers names covered for privacy. The "A+" is on there because we also were celebrating Catholic Schools Week and the theme was "A+ for Catholic Schools". I forgot to take a picture of the kindergarten door, but it was covered with shiny stars and pictures of the children. Really bright and colorful!
 This was the 3/4th grade door (with a lot of sunlight shining in on it from the stairwell!). I had to erase the initials of the school and the name of the teacher. What I really love about this door is that the room mother had the students AND the parents get involved. Each of those handprints has writing on it with things the individual (some students and some parents) appreciates about the teacher. I love this idea!
 Whoops! This mom forgot to measure the door, so we had to do some cutting and rearranging when we went to hang the door decoration after school. Luckily it all worked out! She had each child do anagrams at home of a word they would use to describe the teacher and she included those words in the definition that is printed at the top of the yellow part of the paper. Perfect for a 5th/6th grade classroom.

 My little girl attends Catholic School and we celebrated Catholic Schools Week at the beginning of February. Teacher Appreciation Day was part of Catholic Schools Week--so we have that behind us already even though it seemed really early to be done with it. I thought I'd share what we did to show the teachers at school that we appreciate them.
 First though, during my blog break I missed the chance to write down some news. My little girl finished up kindergarten last year at one Catholic school and then transferred schools over the summer to a different Catholic school (we didn't move). Her new class is a first/second grade classroom and almost immediately she was doing the second grade work rather than the first grade work--and by October she was officially moved up into second grade. She skipped right over first grade and has settled in just fine to second grade. Sniff, sniff--she is growing up so quickly!
 Having her at a new school means I can reuse some of my favorite ideas from last year--no need to recreate the wheel! So we gave these water bottles out to the principal, office manager, music teacher, and PE teacher. I wrote a tutorial last year for how to make the pocket tag. This year I used a cute number printed scrapbook paper behind the Crystal Light packet and I like the "school" effect it gave the tag.
 I made this box of office supply goodies (and chocolate!) for her classroom teacher. Yes, it is nearly identical to the one I made last year for her kindergarten teacher. I even used the same scrapbook paper! I found the idea on eighteen25 and just love it! The box is an embroidery floss box I bought at JoAnn Fabrics for less than $5.
 My daughter's note inside is my favorite part. It says: "Dear XXX, You are a great teacher. You have us do fun activities like the one where we put celery in colored water. I like it when we play jump rope together at recess. I love you. Love, YYY"
 Saturday was a beautiful but chilly day in our area. We took advantage of the break in the weather to enjoy a beautiful 150 acre nature preserve located fifteen minutes from our house.
 It is an amazing place. There is an open meadow area, forested areas, manicured gardens, moss gardens, a Japanese garden, a waterfall, a French Chateau style estate home, a reflecting pool...just an amazing, amazing place to visit. All of this and breathtaking waterviews, too. I'm floored to think this once was a private estate.
 My two don't really understand the concept of a Japanese meditation garden (I'm a little fuzzy on it myself) but they do know that they are NOT allowed to run through the carefully raked sand!
 It was so nice to get out for a nice long walk as a family and do some exploring in a new area. We've been to this garden before, but we haven't really explored it much until today. Now we know we have to keep coming back to watch the changing of the gardens during the upcoming seasons!
 They were fascinated by this little waterfall. I can't wait to come back in the spring and see all those rhodies around it in bloom! We did come across some early blooming flowers on our Saturday visit, but not any rhododendrons.
 My favorite picture of the day! So fun!
 books on the floor...not very pretty or practical!
 Ahh, so much better! There even is room for us to put in some nice wide trimwork instead of that flimsy builder-grade stuff...when we finally get around to that project. Better yet, I don't have to move piles of books when I vacuum!
 Doesn't the shelf next to his bed look cute? Having the covers facing out is so practical and I love the length of the shelf--it lets me display lots of books for him to peruse.
 This is what my babies started doing about fifteen seconds after they saw the new bookshelves!

 Last spring we started the process of building Handsome a bed. My husband and I decided to tackle the Farmhouse Twin bed from Ana White at Knock Off Wood. Then we decided to follow the extra steps in her plans to turn it into a trundle.
 Building it was a long, long process, mostly because I'm a big chicken with power tools, so most of the actual building fell on my husband's shoulders and he could only work on it on the weekends. I did the finishing work, but he did the building (with some help from his pint-size helpers).
 Our little guy was SO excited to finally get to try out his big boy bed! Unfortunately the grownups weren't quite so happy. You see, once we finally got the bed assembled up in his room, we realized that we should have selected a different bed as this is not an ideal bed for a small child whose bed needs to be up against a wall because, um, well, it doesn't exactly GO up against the wall. Our son could (and DID!) fit his entire body between the bed and the wall!
 In this picture I have one pillow between the bed and the wall, but that is because I actually made his bed to take these pictures. You can see that the trim on the top of the bed plus the bed posts themselves make it impossible to put the mattress portion of the bed flush against the wall. Ugh. I really wish I had figured that out BEFORE we built the bed! Whoops!
 At any rate, it looks pretty...especially when I make the bed! And, if you are wondering, his quilt is from Pottery Barn Kids and the sheets are from good ol' Target.
 I love vintage mason jars and have posted about them several times. You can read about my decorating fascination here and here. Unfortunately most of the time my beautiful jars live in a a cupboard because I can't find a way to have them be functional but not be broken by my young children.
 Look how pretty it is! It looks gorgeous in my white beadboard kitchen! MUCH better than the yucky "disposable" soap dispenser from Target that I've been using for five+ years! (Did you ever notice that in the "after" pictures of my kitchen that I don't have a soap dispenser? That is because the one I was using was so ugly that I didn't want it in the pictures of my pretty kitchen!)